Content
Overview
We have done a lot of testing on our iMX6 TinyRex boards. During one of them we spotted a slightly glowing LED when the board was fully turn off. We found out that this behavior was related with an UART serial cable plugged in. We used FTDI TTL-3V3 UART to USB cable for controlling and debugging (here you can find the original datasheet).The next issue which was made by the plugged serial cable occurred in low temperatures. When we wanted to reset the board, bootloader did not come up when this cable was plugged. This is the main reason why we fixed this issue and test it afterwards.
Cable description
To solve the problem we needed to avoid the voltage passing to the not powered board from a FTDI serial cable. On the picture below you can see the pinout of the serial cable.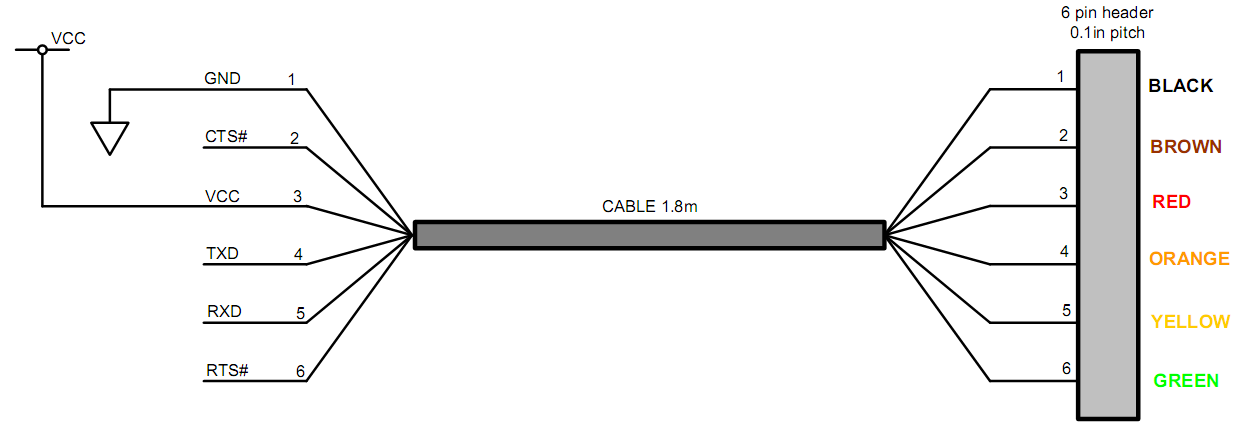
From cable side pins TXD and RTS# are outputs. UART idle state of these pins is high - +3.3V in our case. This high level can go to the internal CPU pull up resistors / protection diodes. Because the board is turned off, a current can pass through pullups to the main +3V3 power rail. This voltage (we measured between 1.3 and 1.8V) can slightly turn on the LED or even prevent from the proper reset.
The rest of the UART signals on the cable - RXD and CTS# act as inputs from the serial cable point of view. Inside the FTDI cable chip FT232RQ is used (you can have a look at it also from the manufacturer site). In the document you can find that the input pins have internal pullups tied to VCCIO voltage. On the input signals we will have a voltage even if CPU outputs are not used. These internal resistors can also create a similar situation as with output pins. This is why we will separate also input signals.
The remaining signals on connector are GND and +5V output from the cable.
Connection & Hardware
The another goal was improving the ESD protection of the CPU pins. When our +3V3 power is down, possible ESD surge cannot pass the ESD diode and discharge in the +3V3 power voltage.For the simplicity we selected a MOSFET transistor as a bus isolator. Here you can find more info and examples. On the picture below you can see the isolation (when you click on the picture whole schematic will appear).

We also added an option to not fit the transistor and bypass it. Dual 2N7002BKS MOSFET transistor (here you can find original datasheet), which we selected, provides up to 2kV ESD protection for all pins. ESD protection can be further enhanced when TVS diode will be fitted.
When we used this isolation (transistor is used as open drain), it is then possible to use a device with another level of serial interface. This way it can be use 5V logic TTL-232R-5V cable or connect a device with an another supply voltage (must be equal or higher to +3.3V). In the boards for production we also added an option to bypass +3V3 board voltage with FTDI supply cable voltage using a diode (only in the direction from the board to the cable). In next stage we will measure if pull up resistor will not affect the waveform of signals.
Testing setup
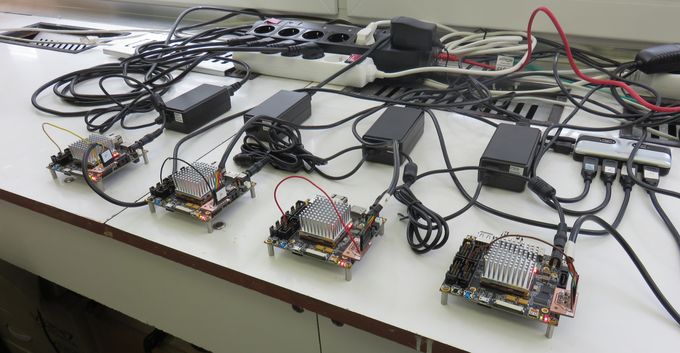
To test the quality of serial communication and reset reliability we built a setup using four iMX6 TinyRex boards. We used a power LAN manageable switch EG-PMS2-LAN to turn on and off the boards in short time intervals. Then we checked if the board booted up to U-Boot through the serial console. For this we have used a simple script (have a look at the software section for more info).Power switch setup
During the testing in an environmental chamber we directly connected the control PC with the LAN switch. To avoid using a network switch or a DHCP server, we used crossover Ethernet cable and static IP addresses. On our control PC we used Ubuntu 9.04 operating system.
To setup the power switch we have done these procedures:
- turn on the switch with crossover cable connected to control PC (with static IP e.g. 192.168.0.1)
- hold IP Config (C) button (the one closest to the Ethernet connector)
- while holding IP Config button press and relese Reset (A) button (the one furthest from the Ethernet connector)
- wait at least 3 seconds while still holding the IP Config button
- release the button and wait at least 1 minute
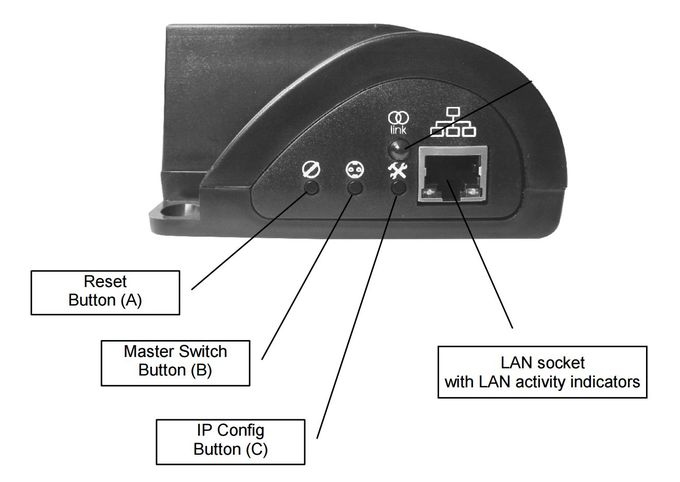
Now you can access the power switch on address 192.168.0.254. You can find detailed information in the user manual of the switch (also located here).
Webcam setup
Sometimes happened that the LAN power switch did not change its state. During the testing we wanted to be 100% sure that the power management is working correctly. For this we used a simple webcam directed to the power switch LED and watches displaying the time. This way we can relaid on our results. We recorded the power indicator for the whole time of the of test. We could then check it with the log file.
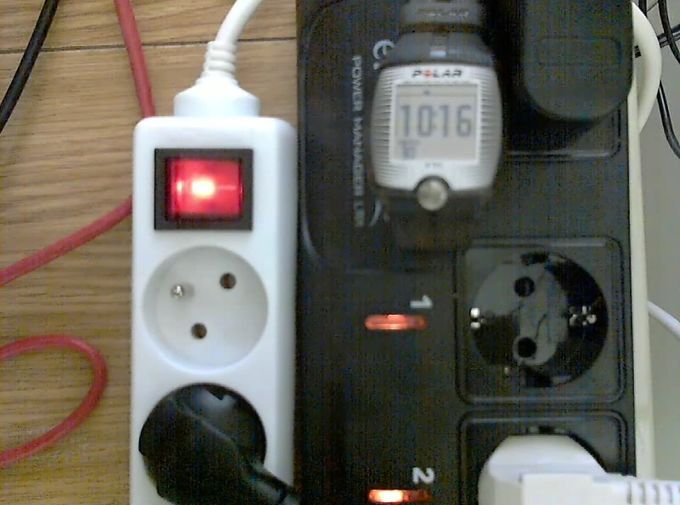
We used Logitech C260 webcam connected to a laptop which recorded its output. Setting up the capturing in Windows is straightforward. Just download the camera app here and install it. Do not forget to create enough space on your hard drive and possibly use smaller resolution.
U-Boot update
We did not want to fully boot the boards into the Linux - we were testing bootloader rather than the kernel booting process. We disabled the auto boot and replaced it with printout of the MAC address (not all our U-Boots shows MAC address automatically).
setenv bootdelay 3
setenv bootcmd 'printenv ethaddr'
saveenv
Starting the test
These are some point you should done before you run the script:
- fit console isolation breakout into the board connector J10. Be sure you plugged it the right way.
- connect cables form breakout to +3V3 power rail (e.g. pin J16-4)
- plug main source adapter into the power jack
- supply all the power adapters from socket 1 only (you can change it in the script)
- connect FTDI serial cable with board and control PC. Use USB hub for more than 2 boards.
- open terminal in your control PC, log as a root and run the script (parameter defines number of used boards during the test):
./testing-reset-multiple-boards.sh 4- you can also open second terminal and list the log file to see what is happening during the test
tail -F testing-reset.log
Results
Lab testingDuring the testing in our lab, we did not see any difference with or without serial cable isolation. All the boards were booting up successfully for over 2 days. Few times we encountered problem with power switch (did not turned off in specific loop). We double checked these moments with the webcam - we have seen that the switch did not work properly in that time. Here you can see one of our final statistics:
iMX6 TinyRex reset testing

Board 0 with MAC 00:0d:15:00:d4:26
 RST-ALL | RST-OK | RST-ERR
    5269 |   5267 |       2

Board 1 with MAC 00:0d:15:00:d4:25
 RST-ALL | RST-OK | RST-ERR
    5269 |   5267 |       2

Board 2 with MAC 00:0d:15:00:d4:27
 RST-ALL | RST-OK | RST-ERR
    5269 |   5267 |       2

Board 3 with MAC 00:0d:15:00:d4:20
 RST-ALL | RST-OK | RST-ERR
    5269 |   5267 |       2

^C2015/09/24-16:57:33 Ctrl+C Detected: End of the test
You can see that we included also another information into the statistics. Firstly we added a number of the board - based on the port where FTDI cable was mapped (e.g. board 1 for /dev/ttyUSB1). Then we printed also the MAC address of specific board from U-Boot environment. This way we could easily differentiate the boards.
Testing in low temperatures
After the testing in a room temperature we have decided to repeat the conditions when we have seen a problem with booting - below the -20°C. For this we again went to the environmental chamber with the boards.
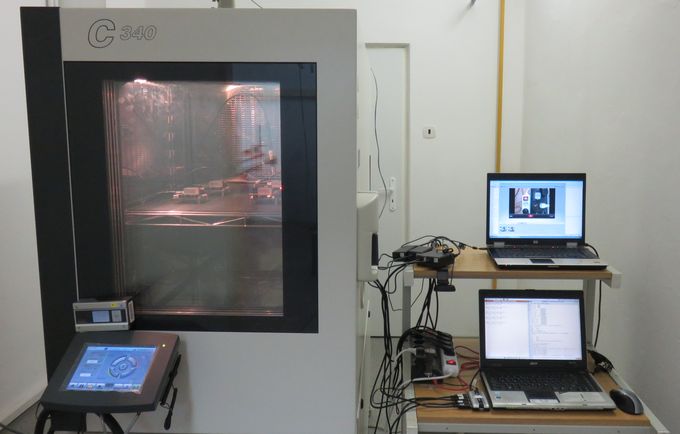
We took two boards with Solo CPU and two boards with Quad Processor into the chamber testing. In first setup we mounted the isolation breakout only for two of them. The remaining two boards were testing without the serial console buffers. The test was running for over on hour in temperature -40°C or below. After we went under the temperature between -5 to -10°C the boards without isolation started failing. The board with serial console breakouts are working perfectly in every temperature.
Then we changed the setup - we took of the breakouts from 2 boards and mounted them on the failing ones. After we went to lower temperatures the boards with console isolation (which were failing in previous setup) now booted every time. Two boards without isolation (which working fine when isolation was mounted) started failing. This way we were sure that the isolation resolved the reset problem for every board. Here you can see the result from one of tested setup (boards 1 and 3 used isolation, boards 0 and 2 were without them):
iMX6 TinyRex reset testing

Board 0 with MAC 00:0d:15:00:d4:26
 RST-ALL | RST-OK | RST-ERR
     221 |    111 |     110

Board 1 with MAC 00:0d:15:00:d4:25
 RST-ALL | RST-OK | RST-ERR
     221 |    221 |       0

Board 2 with MAC 00:0d:15:00:d4:27
 RST-ALL | RST-OK | RST-ERR
     221 |    110 |     111

Board 3 with MAC 00:0d:15:00:d4:20
 RST-ALL | RST-OK | RST-ERR
     221 |    221 |       0
We also did some reset test with long off period in -60°C. Boards with isolation booted up into U-Boot every time.
Waveform measuring
To be sure that the isolators (which act as an open drain outputs) do not affect the signal, we measured it with an oscilloscope. The timing of the signals after the buffers is almost same as for the original signal. Difference for TXD signals is in another level (FTDI cable pulles up the level to +5V).
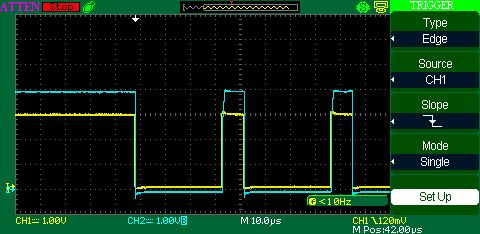
TXD waveforms (CPU output yellow, FTDI input blue)
|
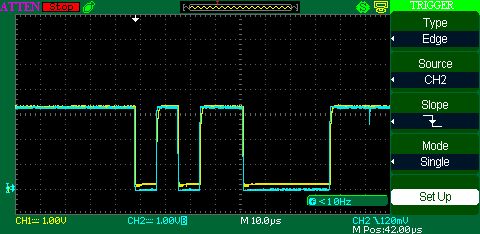
RXD waveforms (CPU input yellow, FTDI output blue)
|
Scripts for testing
Main scriptWe created a long running script for testing the reset. It repeatedly switches on and off the boards to simulate heavy reset conditions. As a result it outputs the statistics and logs into the separate files.
Script is starting by preparing the files which will be used during the test. Apart of summary log file it creates also one separate file to store the current U-Boot output for every board. In each loop are these logs overridden. It also setup variables and the statistics output.
Then the script goes into a infinite loop (it will be terminated by hitting Ctrl+C escape). At first all serial terminals are open - we use picocom terminal. They are opened in separate sessions using screen command. Then we switch on the power and wait for U-Boot to start. The script will then look if the log file contains the string U-Boot at least twice. This way we will know that the boot was completed (you can find string U-Boot in the start and also in the very end):
Script started on Fri 25 Sep 2015 08:31:02 PM CEST
picocom v1.4

port is        : /dev/ttyUSB1
flowcontrol    : none
baudrate is    : 115200
parity is      : none
databits are   : 8
escape is      : C-a
noinit is      : no
noreset is     : no
nolock is      : no
send_cmd is    : ascii_xfr -s -v -l10
receive_cmd is : rz -vv

Terminal ready


U-Boot 2014.10 (Jun 11 2015 - 18:26:04)

CPU:   Freescale i.MX6SOLO rev1.1 at 792 MHz
Reset cause: POR
Board: MX6 Tiny Rex
I2C:   ready
DRAM:  1 GiB
MMC:   FSL_SDHC: 0, FSL_SDHC: 1, FSL_SDHC: 2
In:    serial
Out:   serial
Err:   serial
Net:   FEC
Hit any key to stop autoboot:  0
ethaddr=00:0d:15:00:d4:25
Rex U-Boot >
According to the U-Boot output script will update the statistics. To simulate the worst condition, we will close the picocom terminal in every loop. After the power socket is turned off, the loop starts another iteration.
If Ctrl+C is pressed, testing loop is terminated. In the escape function we close the screen session with opened picocom.
Below you can find the complete script:
#!/bin/bash

# Script used for reset testing of iMX6 TinyRex

# Parameters
	# $1 number of board used in testing
		# it is assumed that serial consoles are connected to ttyUSB0, ttyUSB1 and ascending

# Before running the script
	# plug in the board into the Lan manageable power socket - use socket 4
	# disable booting (use setenv bootcmd)
	# connect board to control PC (Acer laptop) with a FTDI cable
	# be sure all the scripts are located within "/home/fedevel/tiny-testing" directory
	# picocom - serial console is run in bacground 'screen' session with output to uboot.log
		# during the test we will close the terminal

echo "$(date +\%Y/\%m/\%d-\%T) Start iMX6 TinyRex reset testing"

cd /home/fedevel/tiny-testing/					# change path if needed
rm toggle_lamp 2> /dev/null						# remove lock file for socket power switch if exists

num_b=$1

finish_test_now() {
  echo "$(date +\%Y/\%m/\%d-\%T) Ctrl+C Detected: End of the test"
  precced=0										# end of the loop
  for (( i=0; i<$num_b; i++ ))
  do
    screen -X -S "picocom.$i" quit				# quit picocom with associated screen
	echo "Picocom.$i session closed" >> testing-reset.log
  done
  exit;
}

for (( i=0; i<$1; i++ ))								# create and update all files
do
  touch uboot.$i.log									# create temp log file
  cp /dev/null uboot.$i.log								# clear log file
  mac[$i]="00:00:00:00:00:00"							# prepare variables for mac adresses
  #variable for statistics
  num_all[$i]=0
  mun_suc[$i]=0
  mun_uns[$i]=0
done

time_now=`date +%Y-%m-%d.%H:%M`
mv testing-reset.stat old-log/testing-reset.stat.$time_now		# store old statistics if exists
touch testing-reset.stat										# create new statistics file

mv testing-reset.log old-log/testing-reset.log.$time_now	# store old log if exists
touch testing-reset.log										# create whole log file

# prepare statistics
echo -e "iMX6 TinyRex reset testing\n" > testing-reset.stat
for (( i=0; i<$1; i++ ))										# create and update all files
do
  echo "Board "$i" with MAC "${mac[$i]} >> testing-reset.stat
  echo " RST-ALL | RST-OK | RST-ERR" >> testing-reset.stat
  echo -e "       0 |      0 |       0\n" >> testing-reset.stat
done

proceed=1
trap finish_test_now 2								# if Ctrl+C detected; exit the main loop

#turn off before start
bash ./toggle_lan_power.sh 1 off
sleep 5s

while [ $proceed -eq 1 ]
do
  # open picocom in a detached screen window; print the serial console output to log file;
  for (( i=0; i<$1; i++ ))							# create and update all files
  do
    screen -dmS "picocom.$i" script -f -c "picocom /dev/ttyUSB$i -b 115200" uboot.$i.log
	echo -e "Picocom.$i session opened" >> testing-reset.log
  done

  bash ./toggle_lan_power.sh 1 on							# turn on the board
  sleep 10s

  for (( i=0; i<$1; i++ ))									# create and update all files
  do
    # look for U-Boot string and count it - if occurred 2 times bootloader printed the whole message
    res[$i]=`grep -ic "U-Boot" uboot.$i.log`
    num_all[$i]=`expr ${num_all[$i]} + 1`							# increment number of loops

    if [[ "${res[$i]}" -eq 2 ]]
    then
      mun_suc[$i]=`expr ${mun_suc[$i]} + 1`
    else
      mun_uns[$i]=`expr ${mun_uns[$i]} + 1`
    fi

    # store temp files to complete log
    cat testing-reset.stat >> testing-reset.log
    cat uboot.$i.log	>> testing-reset.log
    echo "" >> testing-reset.log								# add new line to the log file

    screen -X -S "picocom.$i" quit								# quit picocom with associated screen

    echo -e "Picocom.$i session closed" >> testing-reset.log
  done

  # update statistics
  echo -e "iMX6 TinyRex reset testing\n" > testing-reset.stat
  for (( i=0; i<$1; i++ ))								# create and update all files
  do
    temp=`grep -iw "ethaddr" uboot.$i.log`
	if [[ -n "$temp" ]]
	then
	  mac[$i]=`echo $temp | grep -o 'ethaddr=.*' | cut -f2- -d'='`	# select mac address from u-boot print
	fi
    echo "Board "$i" with MAC "${mac[$i]} >> testing-reset.stat
    echo " RST-ALL | RST-OK | RST-ERR" >> testing-reset.stat
    printf "  %6d | %6d |  %6d\n\n" ${num_all[$i]} ${mun_suc[$i]} ${mun_uns[$i]} >> testing-reset.stat

	cp /dev/null uboot.$i.log							# clear temp log file
  done

  clear
  cat testing-reset.stat

  bash ./toggle_lan_power.sh 1 off						# turn off the board
  sleep 5s
done
Power switch control script
For switching on and of the LAN power sockets we used a script called Lampengeist created by rewoo. In the script we only changed config variables and added more testing outputs (or redirect some of them to our file instead of system log).
The use of this script is really easy. You just need to specify number of the socket to be changed and the desired new state:
./toggle_lan_power.sh 1 on
The log file will inform you about the update:
2015/09/25-20:32:07 State of 192.168.0.254 socket 1 toggled on by root
This approach have one disadvantage. We cannot check if the switch actually updates the socket state based on our request. It is done without no feedback. This way we encountered some loop numbers when the board was not properly supplied.
Here you can find our updated file:
#!/bin/bash

# This script toggles a socket on
# "energenie LAN programmable power connector"

typeset -a connectors=( 192.168.0.254 )
typeset -a passwords=( 1 )
typeset log_file="testing-reset.log"
typeset toggle="" state_dir="/home/fedevel/tiny-testing" lock_file="/home/fedevel/tiny-testing/toggle_lamp"
typeset -i i=0 socket=1

typeset -r connectors passwords state_dir

while [ -e ${lock_file} ]; do
    if [ $i -gt 10 ]; then
        logger -p user.error -t `basename $0` -s -- "Could not execute - lock file detected."
        echo "Please contact administrator if problem exists for longer time." >&2
        exit 3
    fi
    i=`expr $i + 1`
    sleep 2
done

touch $lock_file

################# FUNCTIONS ###################

usage() {
    cat << EOF
You called ${0} with unsupported option(s).
Usage: ${0} [1|2|3|4] <on|off>
Numbers 1 to 4 stands for the socket number. If no socket is given, it will
toggle socket 1 per default.
Please try again.
EOF
}

get_states() {
# get states of sockets
    if [ $# -ne 1 ]; then
        return 1
    else
        srv=$1
    fi
    states=( $(curl -f http://${srv}/status.html 2>/dev/null | sed -r "s/(.*)((ctl.*)([0|1]),([0|1]),([0|1]),([0|1]))(.*)/\4 \5 \6 \7/") )
}

toggle() {
    local server="" str_state=""
    local -i i=0 state sckt

    if [ $# -ne 3 ]; then
        return 1
    fi

    while [ $# -gt 0 ]; do
        case $1 in
            1|2|3|4)
                sckt=${1}
                shift
                ;;
            "on")
                str_state="${1}"
                state=1
                shift
                ;;
            "off")
                str_state="${1}"
                state=0
                shift
                ;;
            *)
                server="${1}"
                shift
                ;;
        esac
    done

    # poll status and toggle only if needed
    get_states ${server}
    if [ ${state} -ne ${states[$( expr ${sckt} - 1 )]} ]; then
        curl -f -d "ctl${sckt}=${state}" http://${server}/ &>/dev/null
        logger -p user.info -t `basename $0` -- "state of ${server} socket ${sckt} toggled ${str_state} by ${LOGNAME}"
		echo -e $(date +\%Y/\%m/\%d-\%T)" State of ${server} socket ${sckt} toggled ${str_state} by ${LOGNAME}" >> ${state_dir}/${log_file}
    fi
}

persist() {
# for cron job use only
# saves state of sockets

    local state_file
    local -i i=0 j=0
    while [ ${i} -lt ${#connectors[*]} ]; do
        state_file=${state_dir}/${connectors[$i]}

        if (curl -f -d "pw=${passwords[$i]}" http://${connectors[$i]}/login.html 2>/dev/null | grep -q 'status.html'); then
            logger -p user.info -t `basename $0` -- "Save states of ${connectors[$i]} to file ${state_file}"
            # get states
            get_states ${connectors[$i]}
            echo "SavedStates=( ${states[*]} )" > ${state_file}

            j=0
            while [ $j -lt ${#states[*]} ]; do
                j=`expr ${j} + 1`
                toggle ${j} off ${connectors[$i]}
                sleep 1
            done

            curl -f http://${connectors[$i]}/login.html &>/dev/null
            logger -p user.info -t `basename $0` -- "States saved and all sockets switched off"
        else
            logger -p user.error -t `basename $0` -s -- "Login to ${connectors[$i]} failed."
        fi

        i=`expr ${i} + 1`
        typeset +r state_file
    done
}

recover() {
# recovers states from state file

    local state_file new_state
    local -a SavedStates
    local -i i=0 j=0

    i=0
    while [ ${i} -lt ${#connectors[*]} ]; do
        typeset -r state_file=${state_dir}/${connectors[$i]}

        if [ -r ${state_file} ]; then

            source ${state_file}
            if (curl -f -d "pw=${passwords[$i]}" http://${connectors[$i]}/login.html 2>/dev/null | grep -q 'status.html'); then

                logger -p user.info -t `basename $0` -- "Restore socket states from ${state_file} to ${connectors[$i]}"
                j=0
                while [ ${j} -lt ${#SavedStates[*]} ]; do
                    if [ ${SavedStates[$j]} -eq 0 ]; then
                        new_state="off"
                    else
                        new_state="on"
                    fi
                    j=`expr ${j} + 1`
                    toggle ${j} ${new_state} ${connectors[$i]}
                    sleep 1
                done

                curl -f http://${connectors[$i]}/login.html &>/dev/null
                logger -p user.info -t `basename $0` -- "Socket states restored and switched on if needed."
            else
                logger -p user.error -t `basename $0` -s -- "Login to ${connectors[$i]} failed."
            fi
            rm ${state_file}

        else
            logger -p user.error -t `basename $0` -s -- "Could not read file ${state_file}"
        fi

        i=`expr ${i} + 1`
    done
}

common() {
# common mode

local -i i=0

while  [ ${i} -lt ${#connectors[*]} ]; do
    state_file=${state_dir}/${connectors[$i]}
    if [ -e ${state_file} ]; then
        # state file exists -> do not toggle life, change in state file only
        if [ ${new_state} = "on" ]; then
            new_state=1
        elif [ ${new_state} = "off" ]; then
            new_state=0
        fi
        socket=`expr ${socket} - 1`

        source $state_file
        if [ ${SavedStates[${socket}]} -ne ${new_state} ]; then
            SavedStates[${socket}]=$new_state
            echo "SavedStates=( ${SavedStates[*]} )" > ${state_file}
            logger -p user.info -t `basename $0` -- "Toggled state of socket ${socket} to ${new_state} in state file by ${LOGNAME}"
        fi

    else
        if (curl -f -d "pw=${passwords[$i]}" http://${connectors[$i]}/login.html 2>/dev/null | grep -q 'status.html'); then
            toggle ${socket} ${new_state} ${connectors[$i]}
#           curl -f -d "ctl${socket}=${new_state}" http://${connectors[$i]}/ &>/dev/null
            curl -f http://${connectors[$i]}/login.html &>/dev/null
        else
            logger -p user.error -t `basename $0` -s -- "Login to ${connectors[$i]} failed - Common mode."
        fi
    fi
    i=$( expr $i + 1 )
done

}

############# END FUNCTIONS ##################

typeset -r curl_bin="$(which curl | head -n 1)"

if [ -z "${curl_bin}" ]; then
    echo "Tool curl not found. Please install it."
    exit 1
fi

if [ $# -lt 1 ]; then
    echo "No action provided. What should I do?"
    exit 1
fi

while [ $# -ge 1 ]; do
    case ${1} in
        "on"|"off")
            new_state=${1}
            mode="common"
            ;;
        1|2|3|4)
            socket=${1}
            mode="common"
            ;;
        "-r"|"--recover")
            mode="recover"
            ;;
        "-s"|"--save")
            mode="save"
            ;;
        *)
            usage
            rm $lock_file && exit 2
            ;;
    esac

    shift
done

case ${mode} in
    "recover")
        recover
        ;;
    "save")
        persist
        ;;
    "common")
        common
        ;;
esac

rm $lock_file && exit 0 || exit 1
A tip how to update the files
During the debugging when we moved files between Windows and Linus environment we found useful command dos2unix. This can helps when Windows add some special characters into the scripts. Even better option may be to copy and paste files using PuTTy SSH session.
