Your page showing the temperature |
Setting page of your plugin |
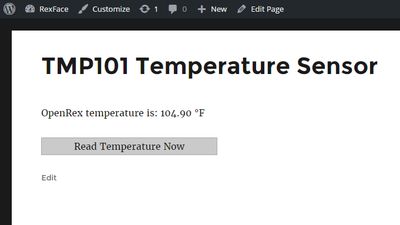
|
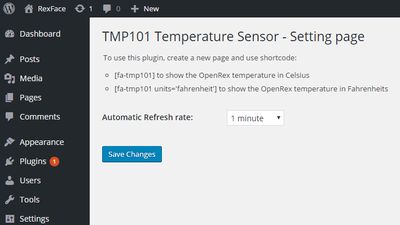
|
Note: Plugins created by this method are perfect for sending input from user (e.g. control an output pin) and are just fine for non frequent readings (e.g reading temperature sensor every 10 seconds). In case you need an EVENT driven plugin (button pressed, accelerometer, gyro, ... ) you may want to have a look also at different methods (e.g. socket.io and node.js).
Content
- Create the essentials of your new plugin
- Create a simple shortcode
- Prepare for reading
- Read the sensor
- Add support for "Fahrenheit"
- Automatic temperature sensor reading
- TADA! Your plugin is done
- Appendix: Uploading your plugin to Github
Create the essentials of your new plugin
In this step, we are going to create a simple plugin which can be activated through WordPress plugins menu and will be visible in our WordPress Admin panel.Switch on your board with WordPress installed on. Go to the WordPress directory. Choose a name for your plugin and create a directory. Important: the name of your plugin must be unique. Consider using your initials in front of all directories, variables and functions. We will be using "fa" which stands for "FEDEVEL Academy":
cd /usr/local/apache2/htdocs/wp-content/plugins/
mkdir fa-tmp101-temperature-sensor
cd fa-tmp101-temperature-sensor/
Create a readme.txt file.
nano /usr/local/apache2/htdocs/wp-content/plugins/fa-tmp101-temperature-sensor/readme.txt*Note: More details about readme.txt requirements can be found here >
Insert the following code into the readme.txt:
=== TMP101 Temperature Sensor ===
Contributors: robertferanec
Tags: tmp101, temperature, sensor
Requires at least: 3.0.1
Tested up to: 4.4.2
Stable tag: 1.0
License: GPLv2 or later
License URI: http://www.gnu.org/licenses/gpl-2.0.html

Shows up temperature of OpenRex board by reading the on board TMP101 sensor.

== Description ==

This plugin will create a shortcode [fa-tmp101]. When you use this shortcode on a page, it will show up temperature of OpenRex. You can choose between Celsius (use [fa-tmp101]) or Fahrenheits (use [fa-tmp101 units='fahrenheit']). The complete step-by-step tutorial about how to create this plugin can be found at: http://www.imx6rex.com/open-rex/software/how-to-create-rexface-plugin/

== Installation ==

1. Upload the plugin files to the WordPress plugin directory (e.g. '/usr/local/apache2/htdocs/wp-content/plugins/') or clone it from our github:

        cd /usr/local/apache2/htdocs/wp-content/plugins/
        git clone https://github.com/FEDEVEL/fa-tmp101-temperature-sensor.git

2. Give the plugin permissions to use 'i2cget' and '/dev/i2c-1'. For example, run 'visudo' and add following lines at the end of the file:

        #enable RexFace to read temperature sensor
        daemon ALL=(ALL:ALL)  NOPASSWD: /usr/sbin/i2cget
        daemon ALL=(ALL:ALL)  NOPASSWD: /dev/i2c-1

3. Activate the plugin through the 'Plugins' screen in WordPress
4. Use the Admin->TMP101 to configure the plugin

== Frequently Asked Questions ==

= How do I use the plugin? =

Create a new page and use shortcode [fa-tmp101]

== Changelog ==

= 1.0 =
* Initial version
Create the main PHP file of our plugin:
nano /usr/local/apache2/htdocs/wp-content/plugins/fa-tmp101-temperature-sensor/fa-tmp101-temperature-sensor.phpCopy and paste this text into fa-tmp101-temperature-sensor.php:
<?php
/*
Plugin Name: TMP101 Temperature Sensor
Plugin URI: http://www.imx6rex.com/rexface/plugins/
Description: Reads and shows up the temperature of OpenRex
Version: 1.0
Author: Robert Feranec, FEDEVEL
Author URI: http://www.fedevel.com/about-robert
Text Domain: fa-tmp101-temperature-sensor
License: GPLv2 or later
License URI: http://www.gnu.org/licenses/gpl-2.0.html

Copyright 2016 by FEDEVEL

This program is free software; you can redistribute it and/or modify
it under the terms of the GNU General Public License as published by
the Free Software Foundation; either version 2 of the License, or
(at your option) any later version.

This program is distributed in the hope that it will be useful,
but WITHOUT ANY WARRANTY; without even the implied warranty of
MERCHANTABILITY or FITNESS FOR A PARTICULAR PURPOSE.  See the
GNU General Public License for more details.

You should have received a copy of the GNU General Public License
along with this program; if not, see http://www.gnu.org/licenses/gpl-2.0.html
*/

//the following line must be here, it's blocking direct access to your plugin PHP files
defined( 'ABSPATH' ) or die( 'No script kiddies please!' );
*Note: More information about header requirements can be found at: WordPress - Header Requirements
Let's create a "TMP101 Setting page" which will be visible under Administrator panel. Later we will use it to specify a default interval for reading the temperature (e.g. read temperature every 10s / 1 minute / 10 minutes).
Add this to the end of fa-tmp101-temperature-sensor.php file:
//This will tell WordPress to call "fa_tmp101_temperature_sensor_admin_menu" which will create a link to our TMP101 Setting page in Admin menu
add_action( 'admin_menu', 'fa_tmp101_temperature_sensor_admin_menu' );

//This will add "TMP101" link into Admin menu
function fa_tmp101_temperature_sensor_admin_menu() {
    //add_menu_page ( page_title, menu_title, capability, __FILE__, function_which_we_call_to_create_our_TMP101_setting_page )
    add_menu_page('TMP101 Temperature Sensor', 'TMP101', 'administrator', __FILE__, 'fa_tmp101_temperature_sensor_admin_sensor_page');
}

//Here is the "HTML" of our Admin TMP101 Temperature Sensor Setting Page
function fa_tmp101_temperature_sensor_admin_sensor_page() {
        if ( !current_user_can( 'manage_options' ) )  {
                wp_die( __( 'You do not have sufficient permissions to access this page.' ) );
        }
        echo '<div class="wrap">';
        echo '<p>This is our Setting page of TMP101 Temperature Sensor plugin. We will put here some options later.</p>';
        echo '</div>';
}
*Note: more information can be find here: WordPress - Administration MenusActivate the plugin
Now, activate and check if you can see your new plugin correctly.1) Open Internet browser and go to your OpenRex admin page http://192.168.0.39/wp-admin/ (use the IP address of your board)
2) Click on Plugins, find "TMP101 Temperature Sensor" and click on "Activate". This is what you should see then:
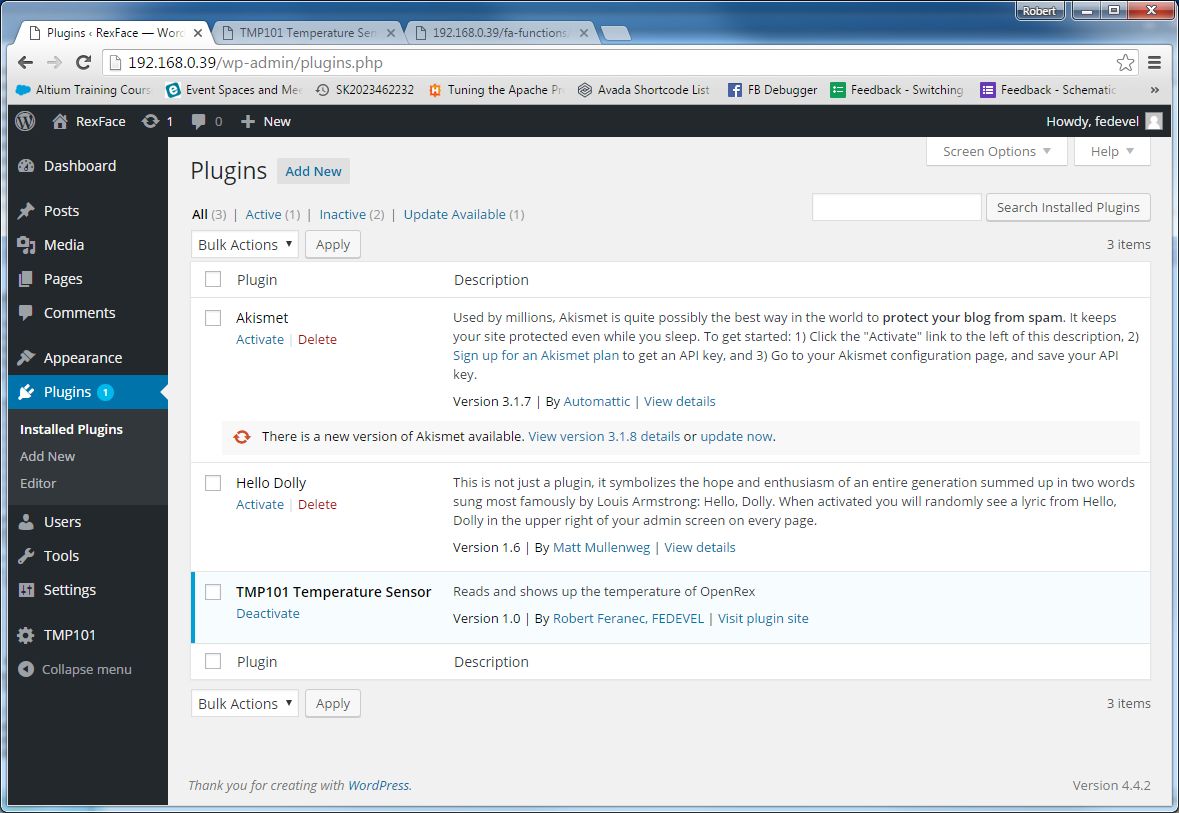
3) In the admin menu, click on: "TMP101". You should see there our TMP101 Setting page:
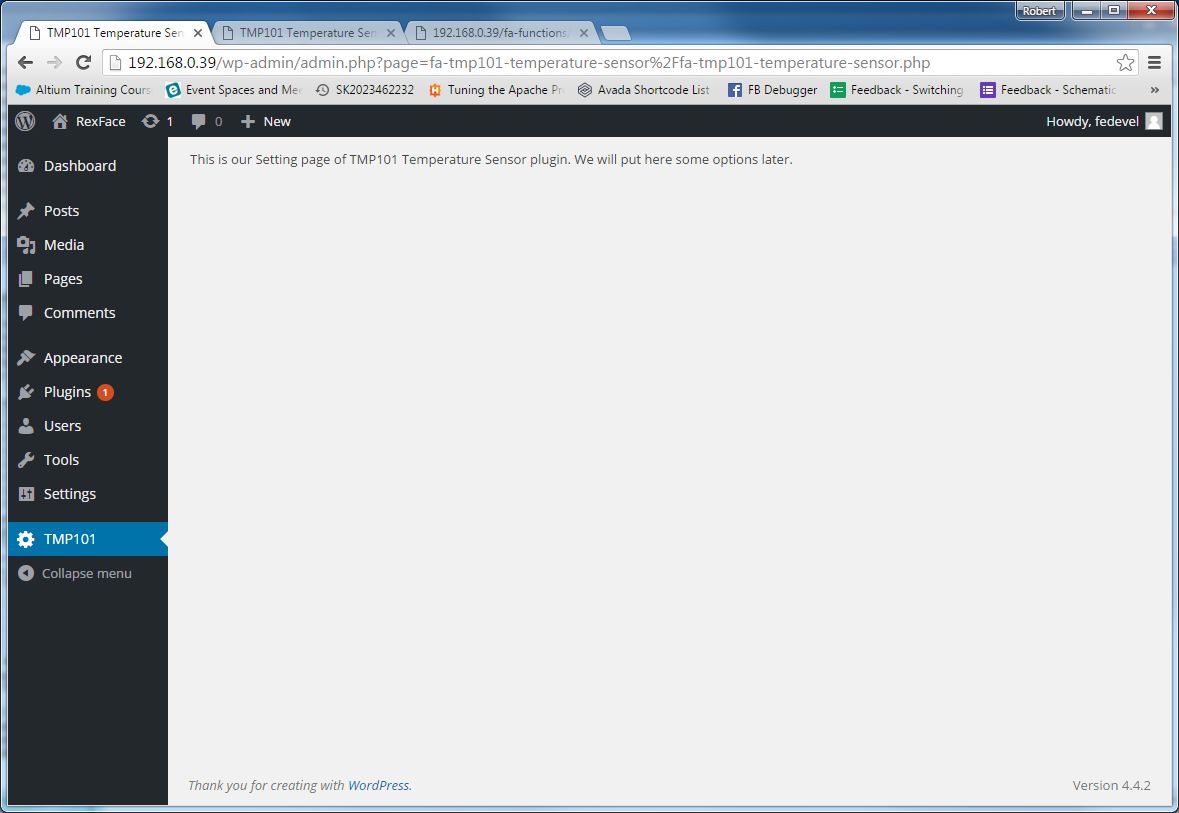
Create a simple shortcode
We are going to create a "[shortcode]". This [shortcode] can be then used anywhere on your Pages and will be replaced by the actual temperature.Our shortcode will be called [fa-tmp101]. Add following lines on the end of "fa-tmp101-temperature-sensor.php":
//[fa-tmp101] shortcode. It will read and show the value of TMP101 OpenRex sensor (not yet, we will later add more stuff here)
add_shortcode("fa-tmp101", "fa_access_tmp101_sensor");
function fa_access_tmp101_sensor($atts, $content = null)
{
	//$new_content will replace the [fa-tmp101] shortcode, initially will use a simple text "Reading ..."
	$new_content = '<span id="fa_tmp101">Reading ...</span>';

	//$new_content string is processed and will be shown instead of the shortcode
	$html_output = do_shortcode($new_content);
	return $html_output;
}
Create a test webpage
In your WordPress Admin menu, click on "Pages" and then "Add New". Enter title: "TMP101 Temperature Sensor" and use following text "OpenRex temperature is: [fa-tmp101]". Then press "Publish" button. This is how it will look: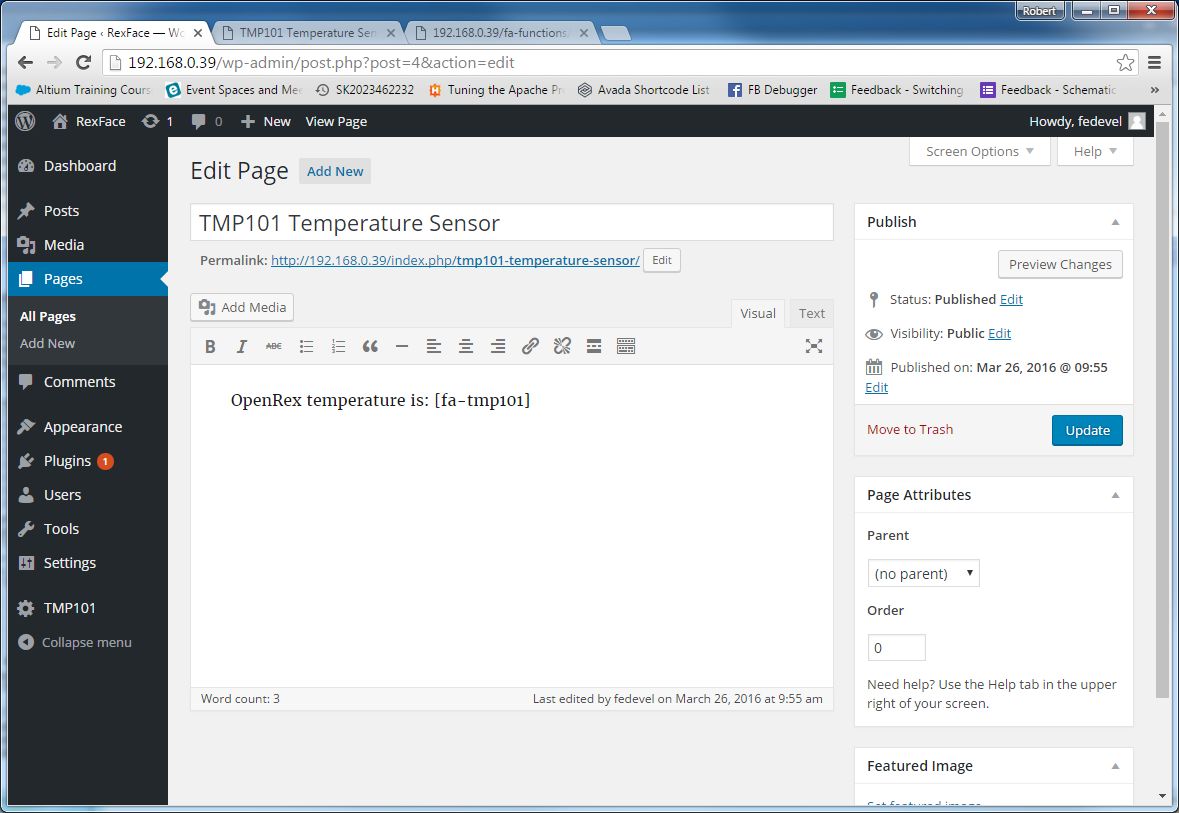 Go on your TMP101 Temperature Sensor page. The page url will look something like: "http://192.168.0.39/index.php/tmp101-temperature-sensor/" and the page itself will look like this (notice, the shortcode [fa-tmp101] is replaced by text "Reading ..."):
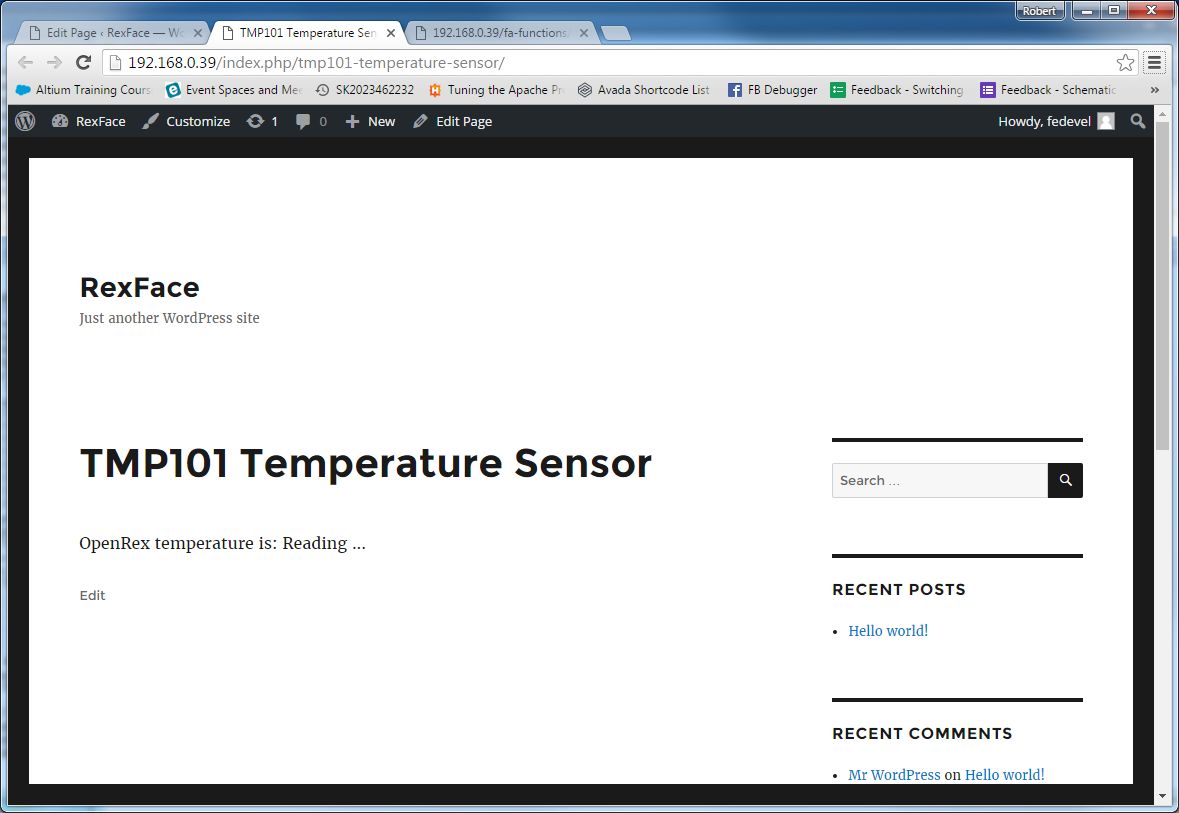 Perfect, the shortcode is working, "only" what we have to do now is update its content. Follow the next steps.
Prepare for reading
It's getting more complicated :) Because we would like to have some flexibility, we will use javascript to read the temperature (e.g. this will give us flexibility to read the temperature on a click, but also it gives us option to read the temperature automatically in some intervals). However, javascript itself can not run applications on OpenRex. Instead, we have to call a PHP file from the javascript ... and in the PHP file we will later call an application which actually can read the temperature. Let's do it.First, we will update the shortcode. Replace the old shortcode with this new one. In this new code we create hidden fields to transfer some variables (IP address and units) to our javascript and we also create a button which we will use to read the temperature:
//[fa-tmp101] shortcode. It will read and show the value of TMP101 OpenRex sensor (still not yet :)
add_shortcode("fa-tmp101", "fa_access_tmp101_sensor");
function fa_access_tmp101_sensor($atts, $content = null)
{
    //$new_content will replace the [fa-tmp101] shortcode
	$new_content = '<span id="fa_tmp101">Reading ...</span>';
	$new_content .= '<div style="background-color:#cacaca;border: 1px solid #acacac; text-align:center; width:300px" onclick="fa_access_tmp101();" >Read Temperature Now</div>'; //button
	$new_content .= '<input type="hidden" id="fa_openrex_ip" value="'.$_SERVER['SERVER_ADDR'].'" />'; //transfer IP address to javascript
	$new_content .= '<input type="hidden" id="fa_tmp101_units" value="celsius" />'; //transfer unites to javascript

    //$new_content string is processed and will be shown instead of the shortcode
    $html_output = do_shortcode($new_content);
    return $html_output;
}
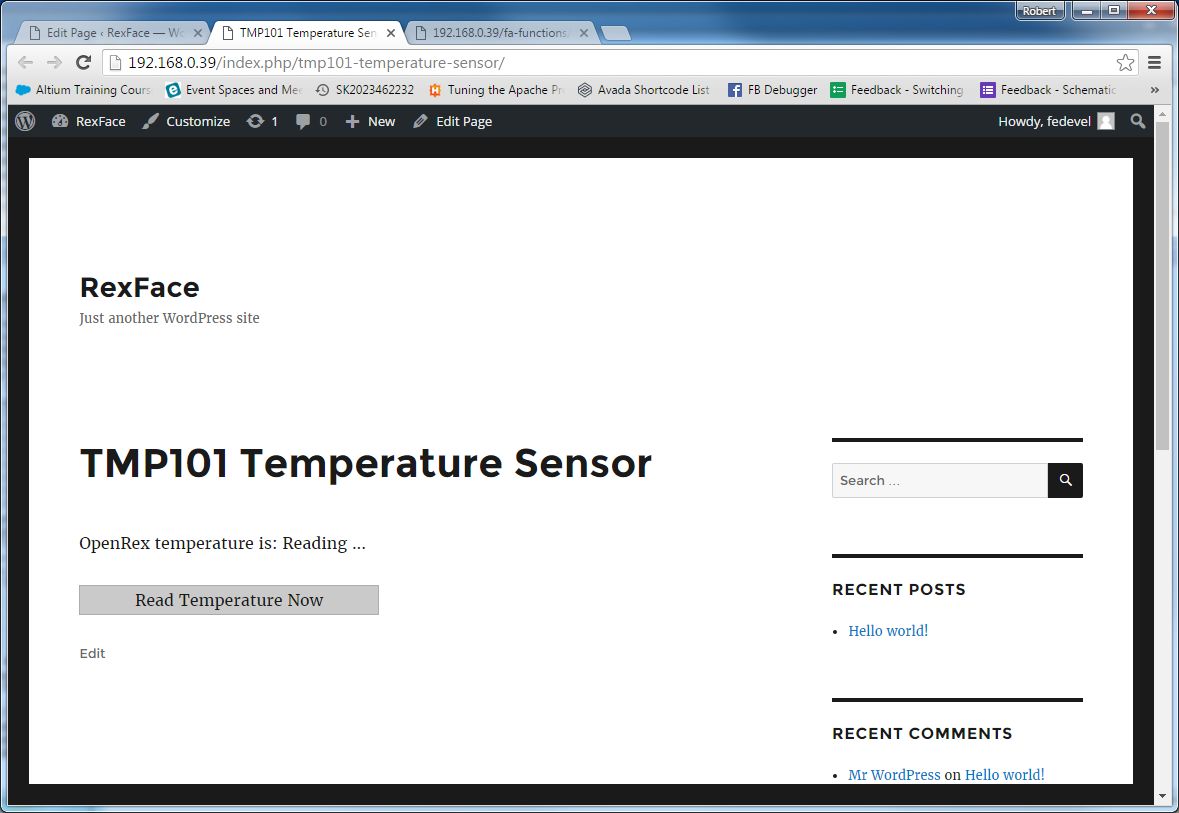
When you refresh "TMP101 Temperature Sensor" page, you will notice, we added "Read Temperature Now" button. If you have a look into our code, when you "Click" on the button, it will call "fa_access_tmp101()" function. This function will be placed in our javascript, which we will create a little bit later. So, do not click on the button, it doesn't work yet.
 Now, create the special PHP file which we will be calling from our javasript and which will later call an application to read the sensor data. At this moment it will only return a message "...accessing sensor ...". Note: Notice the special format of the "response". The format is called JSON. We could transfer only a simple answer (e.g. value of the temperature), but that would not be the proper way to do it. Instead, we are using "OpenRex" structure, where under "sensors" -> "tmp101" we can find "temperature" and "units".
Inside our plugin directory create a new file called "tmp101.php":
nano /usr/local/apache2/htdocs/wp-content/plugins/fa-tmp101-temperature-sensor/tmp101.phpPut this inside the /usr/local/apache2/htdocs/fa-functions/tmp101.php
<?php
/*
Example of the URL address for this file is http://openrex_IP_address/wp-content/plugins/fa-tmp101-temperature-sensor/tmp101.php?units=celsius
*/

$temperature_units = empty($_GET['units'])?'celsius':$_GET['units']; //get temperature units from url, if empty, use celsius

//here we later add the code to read temperature sensor

//this is our response, this is the format how we will send information to javascript.
$result = array(
    'openrex' =>  array(
        'sensors' => array(
            'tmp101' => array(
                'units' => $temperature_units,
                'temperature' => '... accessing sensor ...'
            ),
        ),
    ),
    'valid' => 'true',
    'error_msg' => '',
);

$response = json_encode( $result); //this will translate our $result array into JSON format
echo $response; //this will send the $response back to our javascript
?>
You can simply check, what "tmp101.php" will be sending back to javascript. Go to Internet browser and use url like: "http://192.168.0.39/wp-content/plugins/fa-tmp101-temperature-sensor/tmp101.php" (of course, replace the IP by your OpenRex IP address). This is what you will see:
 Now, let's create the file with our javascript:
mkdir /usr/local/apache2/htdocs/wp-content/plugins/fa-tmp101-temperature-sensor/js/
nano /usr/local/apache2/htdocs/wp-content/plugins/fa-tmp101-temperature-sensor/js/tmp101.js
In the javascript we call tmp101.php PHP file (the file which we have just created). Insert following code into tmp101.js:
//This function will read temperature of OpenRex board by accessing to tmp101.php file and reading TMP101 sensor value
function fa_access_tmp101()
{
        //read IP address and units from our hidden elements created in [shortcode] section of the fa-tmp101-temperature-sensor.php file
        var openrex_ip_address  = document.getElementById("fa_openrex_ip").value; //this will take the value from our hidden input element which has id=fa_openrex_ip (we created it in fa-tmp101-temperature-sensor.php)
        var temperature_units  = document.getElementById("fa_tmp101_units").value; //this will take the value from our hidden input element which has id=fa_tmp101_units (we created it in fa-tmp101-temperature-sensor.php)

        //prepare variables
        var temperature_value = document.getElementById("fa_tmp101"); //this will create a "pointer" to our <span id="fa_tmp101"></span>, so we can replace its content
        var url = 'http://'+openrex_ip_address+'/wp-content/plugins/fa-tmp101-temperature-sensor/tmp101.php?units='+temperature_units; //url of our tmp101.php file

        //this will call tmp101.php file to read the sensor
        request = jQuery.ajax({
                dataType: "json",
                url: url,
        });

        //here we will proceed the answer from tmp101.php file
        request.done (function( data ) { //this will be executed when we get an answer from tmp101.php
                console.log("Done"); //debug output, you can see this in console output (e.g. in Chrome use Right Click -> Inspect element -> Console)
                console.log(data); //debug output

                if (data['valid']==='true')
                {
                        //replace <span id="fa_tmp101"></span> content with the temperature and units
                        temperature_value.innerHTML =  data['openrex']['sensors']['tmp101']['temperature']+' '+data['openrex']['sensors']['tmp101']['units'];
                        return true;
                }
                else
                {
                        //replace <span id="fa_tmp101"></span> content with the error message
                        temperature_value.innerHTML = data['error_msg'];
                        return false;
                }
        });

        request.fail (function( data ) { //this will be executed if we will not get answer from tmp101.php
                console.log("Failed"); //debug output
                //replace <span id="fa_tmp101"></span> content with "Connection failed" message
                temperature_value.innerHTML = 'Connection failed';
                return false;
        });
}
We need to go back to our main plugin file and tell to load the javascript. Add this to the end of fa-tmp101-temperature-sensor.php:
//we will be using javascript, so load the javascript file
add_action( 'wp_enqueue_scripts', 'fa_tmp101_scripts' );
function fa_tmp101_scripts() {
    wp_enqueue_script("jquery-fa-tmp101", plugins_url("/js/tmp101.js", __FILE__ ),array('jquery', 'jquery-ui-core'));
}
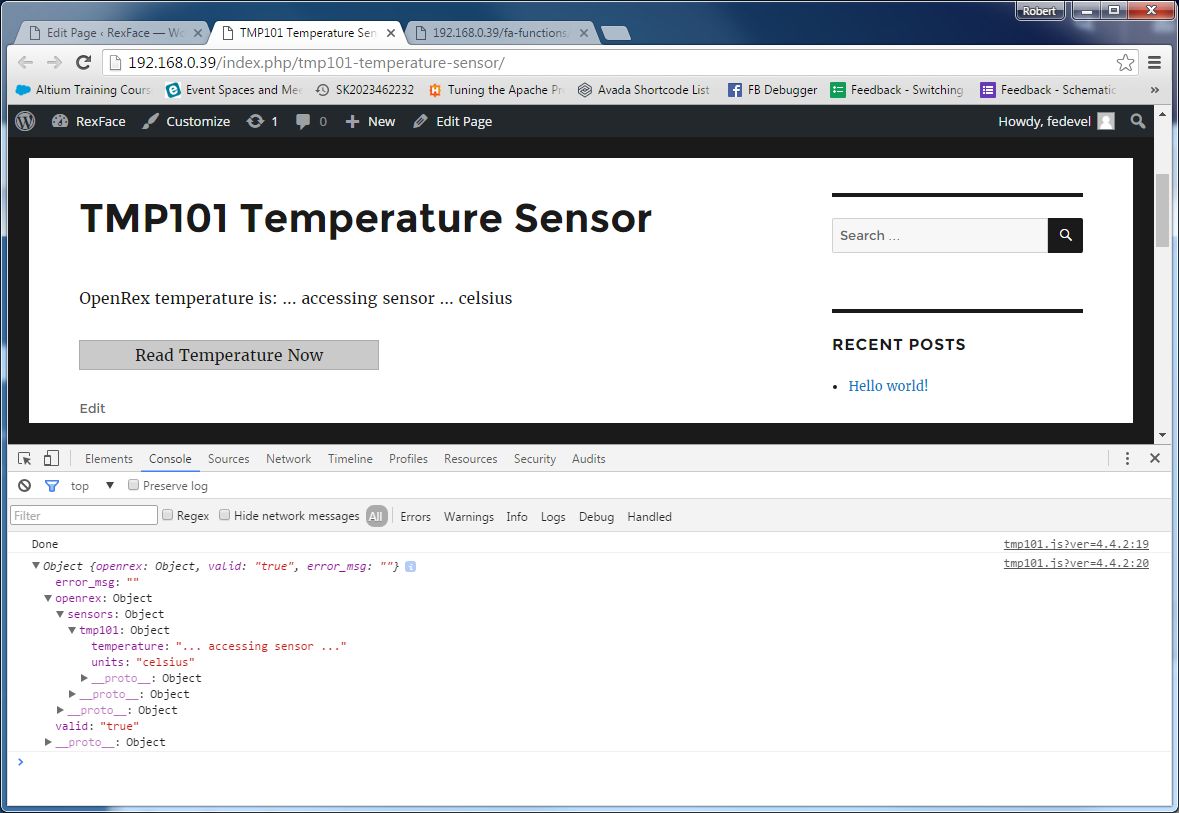
Go back to your TMP101 Temperature Sensor page ( http://192.168.0.39/index.php/tmp101-temperature-sensor/ ). Refresh it (in Chrome, use F5). We would like to see if our javascript is working ok ... press Right click on the page and select "Inspect elements". Click on "Console" and then click on "Read Temperature Now" button. Notice, instead of "Reading ..." it now says "... accessing sensor ... celsius". Inspect the response in the "Console" window - you will see there "tmp101.php" answer: Object -> openrex -> sensors -> tmp101. This is how it will look:
Read the sensor
What we need to do now, are two things. First, we need to run the standard Linux command which will read the sensor. Then we need to take the "sensor value" and transform it to "Celsius" or "Fahrenheit". Edit "/usr/local/apache2/htdocs/wp-content/plugins/fa-tmp101-temperature-sensor/tmp101.php":nano /usr/local/apache2/htdocs/wp-content/plugins/fa-tmp101-temperature-sensor/tmp101.phpand change it to:
<?php
/*
Example of the URL address for this file is http://openrex_IP_address/wp-content/plugins/fa-tmp101-temperature-sensor/tmp101.php?units=celsius
*/

$temperature_units = empty($_GET['units'])?'celsius':$_GET['units']; //get temperature units from url, if empty, use celsius

//Run i2cget Linux command to read temperature from the onboard TMP101 sensor
$ret = exec('sudo i2cget -f -y 1 0x48 0x00 w',$out,$err);

//based on TMP101 datasheet, we need to calculate the temperature:
$ret =  hexdec(str_replace('0x', '', $ret)); //remove 0x from begining and convert it to DEC
$temperature = (($ret & 0x00FF)<<4) | (($ret & 0xF000)>>12);  //swap the bytes and shift them by 4 to the right
if ($temperature & 0x0800)
    $temperature = 0 - (0x07FF & (~$temperature)) * 0.0625; //if temperature is negative (below 0 Celsius)
else
    $temperature = $temperature *  0.0625; //if temperature is positve (above 0 Celsius)

//if we would like the answer from tmp101.php to be in Fahrenheit, convert the temperature
if ($temperature_units != 'celsius')
    $temperature = sprintf("%0.2f",$temperature * 9 / 5 + 32);

//prepare the answer
$result = array(
    'openrex' =>  array(
        'sensors' => array(
            'tmp101' => array(
                'units' => ($temperature_units == 'celsius')?' °C':' °F',
                'temperature' => $temperature
            ),
        ),
    ),
    'valid' => 'true',
    'error_msg' => '',
);

$response = json_encode( $result); //this will transfer our result array into JSON
echo $response; //this will send the response to our javascript
?>
VERY IMPORTANT!To be able to run an application from website, you need to set proper permissions. By default, it's disabled due security reasons (so not everyone can run Linux commands on your board). One way how to enable "web" to run i2cget (the command which we use to read the temperature sensor) is to add exceptions through "visudo".
1) Check under what user the webserver is running, e.g. run:
ps aux | egrep '(apache|httpd)'In our case, the web user is called "daemon".
2) In the OpenRex Linux run command "visudo" and add following lines at the end of the file. Specify the applications and resources which the "exec" command will be using:
#enable wesbserver to read temperature sensor
daemon ALL=(ALL:ALL)  NOPASSWD: /usr/sbin/i2cget
daemon ALL=(ALL:ALL)  NOPASSWD: /dev/i2c-1
This is how your "visudo" may look after the changes:
#
# This file MUST be edited with the 'visudo' command as root.
#
# Please consider adding local content in /etc/sudoers.d/ instead of
# directly modifying this file.
#
# See the man page for details on how to write a sudoers file.
#
Defaults        env_reset
Defaults        mail_badpass
Defaults        secure_path="/usr/local/sbin:/usr/local/bin:/usr/sbin:/usr/bin:/sbin:/bin"

# Host alias specification

# User alias specification

# Cmnd alias specification

# User privilege specification
root    ALL=(ALL:ALL) ALL

# Members of the admin group may gain root privileges
%admin ALL=(ALL) ALL

# Allow members of group sudo to execute any command
%sudo   ALL=(ALL:ALL) ALL

# See sudoers(5) for more information on "#include" directives:

#includedir /etc/sudoers.d
%admin  ALL=(ALL) ALL

#enable webserver to read temperature sensor
daemon ALL=(ALL:ALL)  NOPASSWD: /usr/sbin/i2cget
daemon ALL=(ALL:ALL)  NOPASSWD: /dev/i2c-1
Go to your website, refresh it (F5) and click on "Read Temperature Now" button. You should see the current OpenRex temperature in Celsius :)
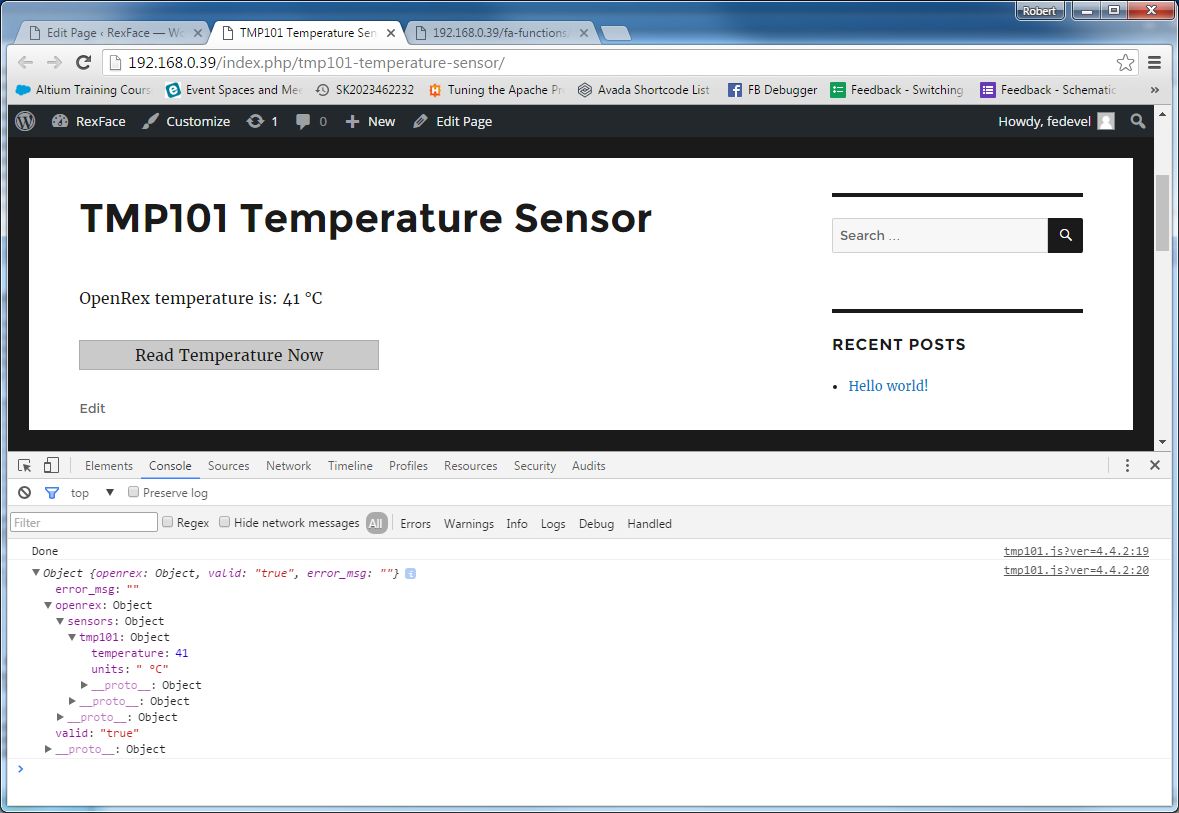
Add support for "Fahrenheit"
Let's say, you would like to add also support for "Fahrenheit". We will add a shortcode parameter which will specify "units". Then you will use it like [fa-tmp101 units='fahrenheit']. Update our "fa-tmp101-temperature-sensor.php". It will look then like this:
//[fa-tmp101] shortcode. It will read and show the value of TMP101 OpenRex sensor.
//To get the temperature in Celsius, use [fa-tmp101]
//To get the temperature in Fahrenheit, use [fa-tmp101 units='fahrenheit']
add_shortcode("fa-tmp101", "fa_access_tmp101_sensor");
function fa_access_tmp101_sensor($atts, $content = null)
{
    extract( shortcode_atts( array(
        'units' => 'celsius', //default 'units' value is 'celsius'
    ), $atts ) );

    //$new_content will replace the [fa-tmp101] shortcode
    $new_content = '<span id="fa_tmp101">Reading ...</span>';
    $new_content .= '<div style="background-color:#cacaca;border: 1px solid #acacac; text-align:center; width:300px" onclick="fa_access_tmp101();" >Read Temperature Now</div>'; //button
    $new_content .= '<input type="hidden" id="fa_openrex_ip" value="'.$_SERVER['SERVER_ADDR'].'" />'; //transfer IP address to javascript
    $new_content .= '<input type="hidden" id="fa_tmp101_units" value="'.$units.'" />'; //transfer unites to javascript

    //$new_content string is processed and will be shown instead of the shortcode
    $html_output = do_shortcode($new_content);
    return $html_output;
}
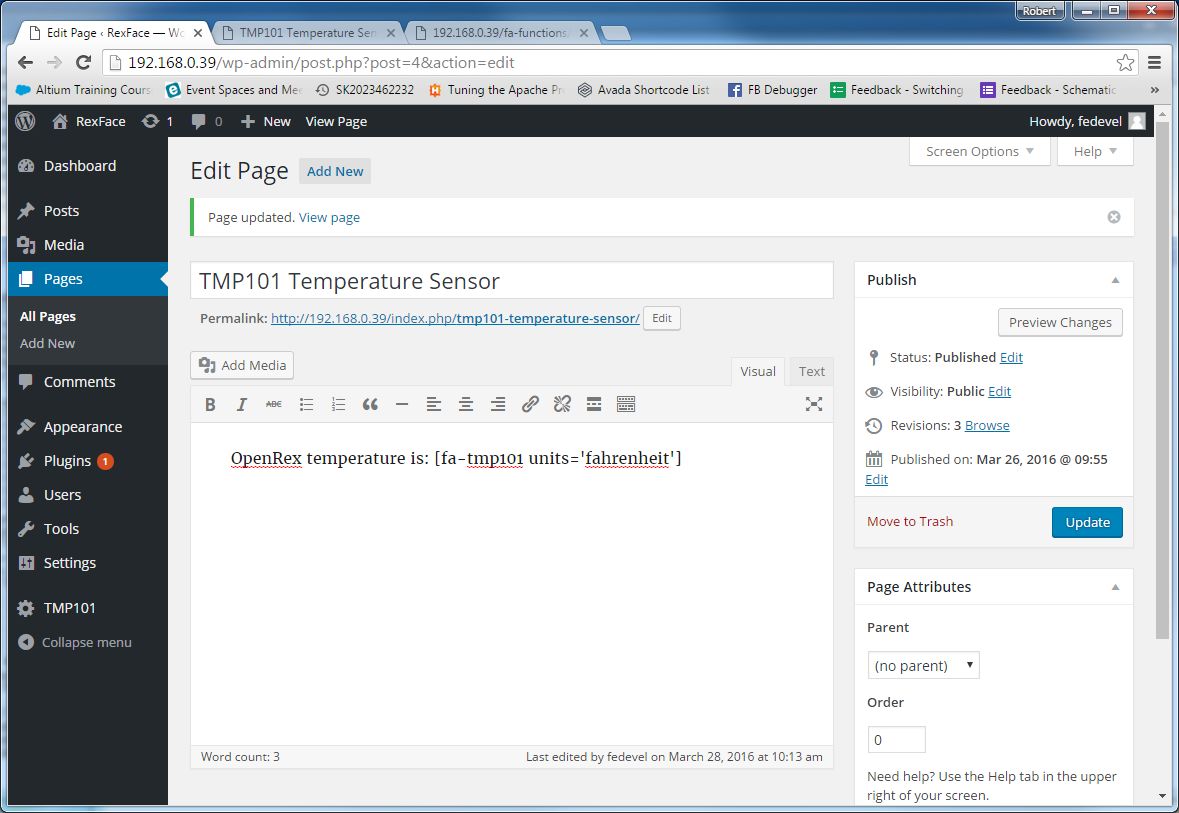
Now, go to your TMP101 Sensor page and edit it. Replace "OpenRex temperature is: [fa-tmp101]" for "OpenRex temperature is: [fa-tmp101 units='fahrenheit']". Don't forget press "Update". This is how it will look:
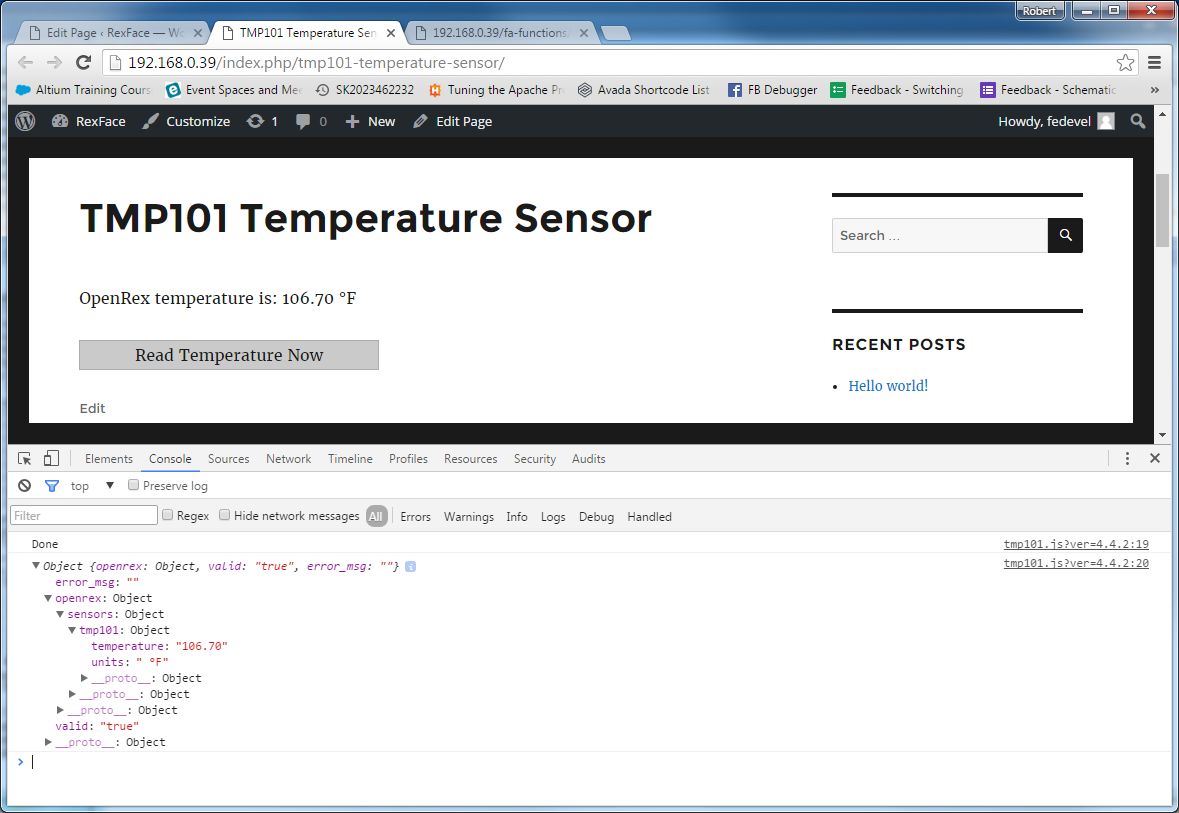
 Refresh the "TMP101 Temperature Sensor" page (press F5), click on the "Read Temperature Now" button, and here is the result:
Automatic temperature sensor reading
Add "Refresh rate" option into TMP101 Setting page
We will be editing our main fa-tmp101-temperature-sensor.php plugin file.First we will create a refresh_rate "variable", which we will be using inside our plugin. Remove this:
//This will add "TMP101" link into Admin menu
function fa_tmp101_temperature_sensor_admin_menu() {
        //add_menu_page ( page_title, menu_title, capability, __FILE__, function_which_we_call_to_create_our_TMP101_setting_page )
        add_menu_page('TMP101 Temperature Sensor', 'TMP101', 'administrator', __FILE__, 'fa_tmp101_temperature_sensor_admin_sensor_page');
}
and add this:
//This will add "TMP101" link into Admin menu
function fa_tmp101_temperature_sensor_admin_menu() {
    //add_menu_page ( page_title, menu_title, capability, __FILE__, function_which_we_call_to_create_our_TMP101_setting_page )
    add_menu_page('TMP101 Temperature Sensor', 'TMP101', 'administrator', __FILE__, 'fa_tmp101_temperature_sensor_admin_sensor_page');

    //you can set refresh rate in admin panel. this will help us to create refresh_rate "variable"
    add_action( 'admin_init', 'fa_register_tmp101_temperature_sensor_settings' );
}

//let wordpress to know about our refresh_rate setting which we will be able to set in the TMP101 Setting page of Admin section
function fa_register_tmp101_temperature_sensor_settings() {
    register_setting( 'fa-tmp101-temperature-sensor-settings-group', 'refresh_rate' );
}

//when our TMP101 Temperature Sensor plugin is activated, set the "refresh_rate" to default value of 1 minute
register_activation_hook( __FILE__, 'fa_tmp101_set_default_options' );
function fa_tmp101_set_default_options(){
    update_option('refresh_rate', '60000'); //default value for refresh_hrate will be 1 minute
}
Add "Refresh rate" on our TMP101 Temperature Sensor setting page. Delete this:
//Here is the "HTML" of our Admin TMP101 Temperature Sensor Setting Page
function fa_tmp101_temperature_sensor_admin_sensor_page() {
        if ( !current_user_can( 'manage_options' ) )  {
                wp_die( __( 'You do not have sufficient permissions to access this page.' ) );
        }
        echo '<div class="wrap">';
        echo '<p>This is our Setting page of TMP101 Temperature Sensor plugin. We will put here some options later.</p>';
        echo '</div>';
}
And put there this instead:
//Here is the "HTML" of our Admin TMP101 Temperature Sensor Setting Page
function fa_tmp101_temperature_sensor_admin_sensor_page() {
        if ( !current_user_can( 'manage_options' ) )  {
                wp_die( __( 'You do not have sufficient permissions to access this page.' ) );
        }
        ?>
        <div class="wrap">
        <h2>TMP101 Temperature Sensor - Setting page</h2>

        <div class="wrap">
                To use this plugin, create a new page and use shortcode:
		<ul style="list-style-type: circle; padding-left: 20px">
			<li>[fa-tmp101] to show the OpenRex temperature in Celsius</li>
			<li>[fa-tmp101 units='fahrenheit'] to show the OpenRex temperature in Fahrenheits</li>
		</ul>
        </div>

        <form method="post" action="options.php">
            <?php
            settings_fields( 'fa-tmp101-temperature-sensor-settings-group' );
            do_settings_sections( 'fa-tmp101-temperature-sensor-settings-group' );
            $refresh_rate = esc_attr(get_option('refresh_rate'));
            ?>
            <table class="form-table">
                <tr valign="top">
                <th scope="row">Automatic Refresh rate:</th>
                <td>
                    <select name="refresh_rate">
                        <option value="10000" <?php echo ($refresh_rate == "10000")?"selected":""?> >10 seconds</option>
                        <option value="60000" <?php echo ($refresh_rate == "60000")?"selected":""?> >1 minute</option>
                        <option value="600000" <?php echo ($refresh_rate == "600000")?"selected":""?> >10 minutes</option>
                    </select>
                </td>
                </tr>
            </table>

            <?php submit_button(); ?>

        </form>
        </div>
        <?php
}
Go to "Admin menu -> Plugins -> Installed Plugins -> TMP101 Temperature Sensor -> Deactivate". Then activate it again: "Admin menu -> Plugins -> Installed Plugins -> TMP101 Temperature Sensor -> Activate". Click on the TMP101 link in Admin menu and this is what you should see: 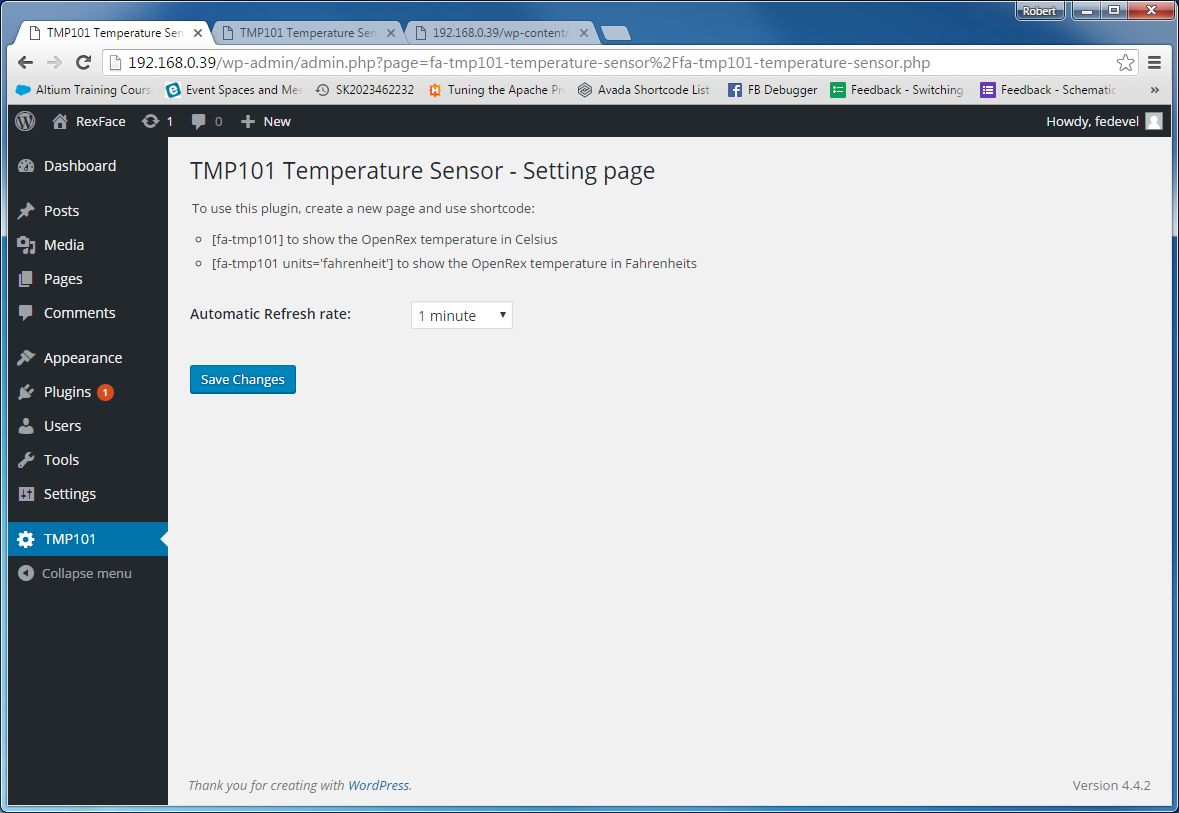
Run the javascript at the selected refresh rate
Only what is missing is to add a code which will start our "fa_access_tmp101()" javascript function at the selected refresh rate. Let's add a simple script into our [fa-tmp101] shortcode. Update it to:
//[fa-tmp101] shortcode. It will read and show the value of TMP101 OpenRex sensor.
//To get the temperature in Celsius, use [fa-tmp101]
//To get the temperature in Fahrenheit, use [fa-tmp101 units='fahrenheit']
add_shortcode("fa-tmp101", "fa_access_tmp101_sensor");
function fa_access_tmp101_sensor($atts, $content = null)
{
    extract( shortcode_atts( array(
        'units' => 'celsius', //default 'units' value is 'celsius'
    ), $atts ) );

    //$new_content will replace the [fa-tmp101] shortcode
    $new_content = '<span id="fa_tmp101">Reading ...</span>';
    $new_content .= '<div style="background-color:#cacaca;border: 1px solid #acacac; text-align:center; width:300px" onclick="fa_access_tmp101();" >Read Temperature Now</div>'; //button
    $new_content .= '<input type="hidden" id="fa_openrex_ip" value="'.$_SERVER['SERVER_ADDR'].'" />'; //transfer IP address to javascript
    $new_content .= '<input type="hidden" id="fa_tmp101_units" value="'.$units.'" />'; //transfer unites to javascript

    ?>
    <script>

        //when the page is loaded, read the temperature
        window.onload=init_fa_tmp101_scripts;
        function init_fa_tmp101_scripts()
        {
            fa_access_tmp101();
        }

        //SetInterval runs at the selected refresh rate
        setInterval(function()
        {
            fa_access_tmp101(); //read the temperature
        }, <?php echo esc_attr(get_option('refresh_rate')); ?>);

    </script>
    <?php

    //$new_content string is processed and will be shown instead of the shortcode
    $html_output = do_shortcode($new_content);
    return $html_output;
}
Now, go to your TMP Temperature Sensor page and refresh it (F5). Every 1 minute you should see the reading. It will look like this:
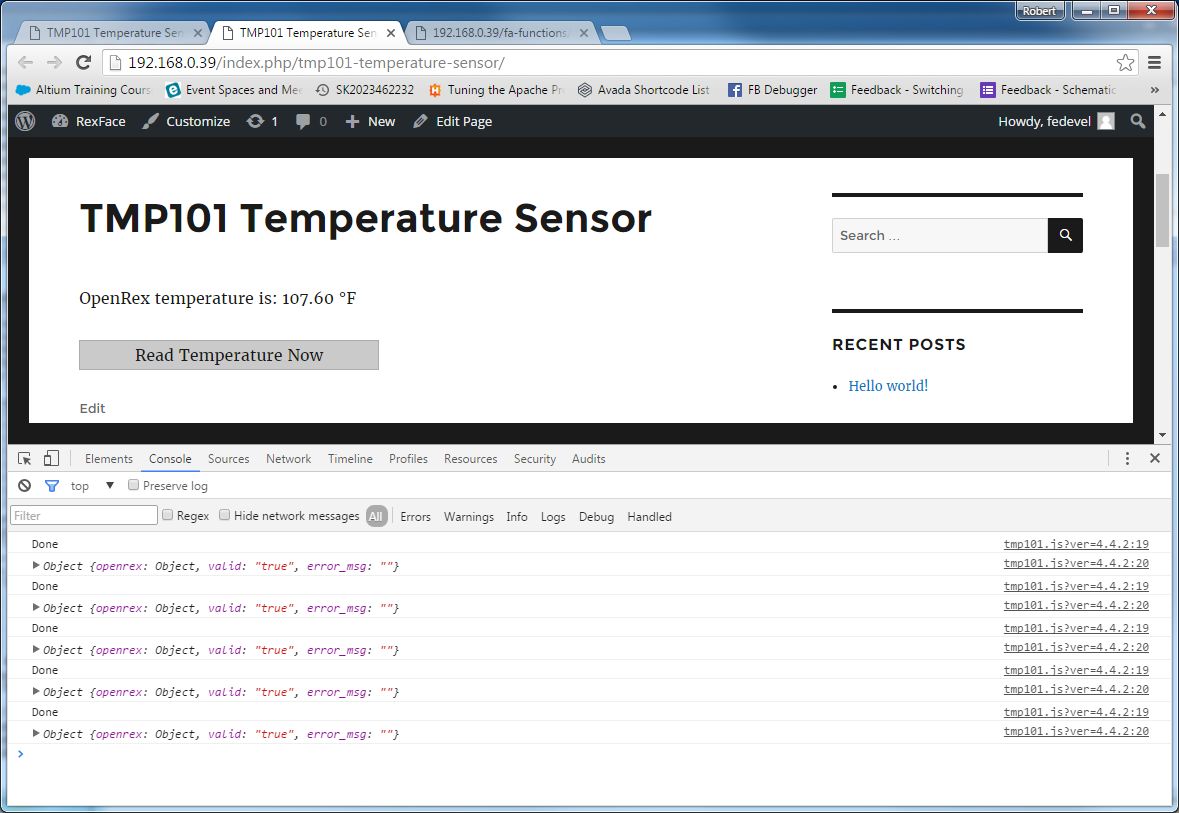 If you would like to change the refresh rate, just go to your TMP101 Temperature Sensor Settings, change the refresh rate and press "Save Changes" button. Go back to "TMP101 Temperature Sensor" page and refresh it.
TADA! Your plugin is done
You can remove the debug messages and play with the code. The final files can be found on our FEDEVEL Github here >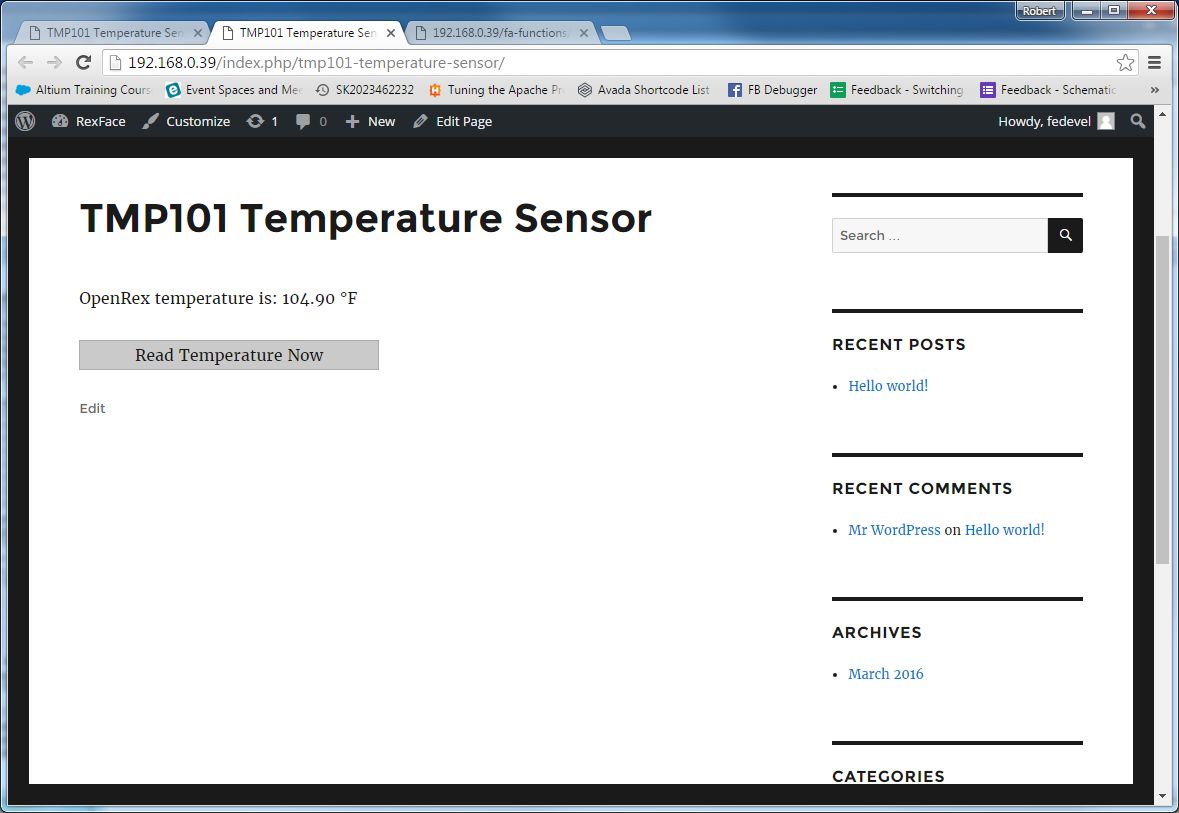
Appendix: Uploading your plugin to Github
In case you would like to share your plugin, you can simply upload it to Github. This is how you can do it.1) Go to your Gihub and create a new repository.
2) Then run following commands:
cd /usr/local/apache2/htdocs/wp-content/plugins/fa-tmp101-temperature-sensor
git config --global user.email "you@example.com"
git config --global user.name "Your Name"
git init
git add .
git commit -m 'Initial version'
git remote add origin https://github.com/FEDEVEL/fa-tmp101-temperature-sensor.git
git push -u origin master
